Libreswan Documentation

Libreswan's Online Documentation
View the Project on GitHub libreswan/libreswan.github.io
SupportHOWTO
Additional ipsec.conf documentationAWS Mesh
brendans Road Warrior Setup at Home
Configuration examples
Confuse !?@: github wiki
Enterprise cloud encryption
Entropy matters
EoIP shared ethernet LAN using IPsec
High Availability Fallover VPN in AWS
Host to host VPN
Host to host VPN with PSK
Libreswan as client to a Cisco ASA or VPN3000 server
Microsoft Azure configuration
Migrate from IKEv1 DPD to IKEv2 LIVENESS
Opportunistic IPsec
Opportunistic IPsec using LetsEncrypt
Pluto and DNSSEC
Read status output
Route based VPN
SElinux and Labeled IPsec VPN
Subnet extrusion
Subnet to subnet using NAT
Subnet to subnet VPN
Subnet to subnet VPN with PSK
Unauthenticated Opportunistic IPsec
Using Apache to serve PKCS
Using NSS Hardware Tokens
Using NSS with libreswan
VPN server for remote clients using IKEv2
VPN server for remote clients using IKEv2 split VPN
Completed Projects
2026 RFC 9593 Announcing Supported Authentication Methods in IKEv22026 Improve the ACQUIRE to IKE policy lookup
2026 Add HOST TO HOST Support on BSD
2021 RFC 8420 Add EdDSA Signature Authentication Support to IKEv2
2020 Session Resumption
2020 IKEv2 Interop testing with OpenBSD
2020 IKE Intermediate Exchange
2019 Libreswan Opportunistic IPsec using LetsEncrypt
2018 RSA PSS Support in compliance with RFC 7427 and RFC 8247
2018 RFC 7427 Add ECDSA Signature Authentication Support to IKEv2
2018 RFC 5685 Redirect Mechanism
2018 Managing Interface
2017 TCP encapsulation of IKE and IPsec
2017 RFC 7427 Add Signature Authentication Support to IKEv2
2017 Postquantum Preshared Keys
IRC
Hacking
DocumentationGit, GitHub, and Pull Requests
Merging GitHub Pull Requests
Programming Conventions
Testing
DockerKVM
1. Setup The Host2. Configure Testing
3. Compile Libreswan
4. Test Libreswan
5. Accessing The Console
6. Maintenance and Internals
Bisecting
Debugging Pluto
Logging In Using SSH
Performance
Running A Custom Kernel
Running A Single Test
Running In The Background
Setup a Web Server
Testing Old Branches
Updating Test Results
Namespaces
Topology
Internals
3.14 X509Benchmarking and Performance testing
Cipher suites and algorithm support
Cloud OE ideas
Compiling with AddressSanitizer
Compliance of RFC 7427 Signature Authentication in IKEv2
Coverity
Cryptographic Acceleration
Developer links strongswan android
Discouraged or forbidden C functions
IKEv2 Child SA
IKEv2 CP and EAP support
Introduction
Libreswan xfrm kernel support
Logging cleanup
New OE
Pluto
Pluto packet processing
Proposed ipsec ca command
Retransmit timings
Road Map
SAref code
Setting up system for debug logging
stf status
Testing 2017 Next Generation
Unbound
Uncrustify
Use Cases and Requirements document for ECC ECDSA support
Use Cases and Requirements document
XFRM Interface Development Notes
XFRM pCPU
XFRM pCPU RSS
Security
Crypto boundary and certificationLibreswan and Heartbleed
Libreswan and TunnelCrack
Reporting a Vulnerability
Vulnerabilities
Obsolete HOWTOs
IKEv1 XAUTH with FreeOTP and FreeIPAIKEv1 XAUTH with Google Authenticator One Time Passwords
Route based VPN using VTI
Testing Namespace
VPN server for remote clients using IKEv1 with L2TP
VPN server for remote clients using IKEv1 XAUTH with Certificates
VPN server for remote clients using IKEv1 XAUTH with PSK
Introduction
This HOWTO was written by Matt Woodson of Red Hat
The Openshift Operations team at Red Hat deploys services in Amazon Web Services (AWS). Openshift Nodes and related infrastructure are located in multiple AWS regions, so that users can place apps in a region geographically close to them. We needed a way to to inter-connect all of our regions via a VPN, but at this time, AWS does not provide a way to connect regions together.
First, we devised a list of requirements:
- We wanted to use Red Hat technologies.
- We wanted our VPN’s to be highly available (HA).
- We wanted to be able to monitor the VPN connections.
As a quick note, we investigated using libreswan to connect to AWS VPC VPN . We quickly found that AWS VPC is broken and moved on to design other solution.
TODO:
- put in a stonith delay on the primary node;
- enable wait_for_all;
Overview
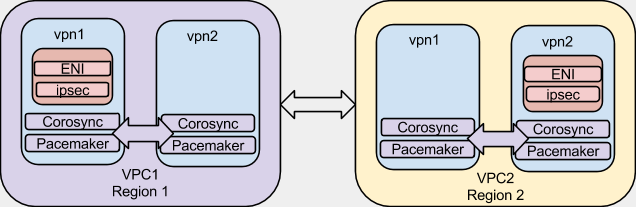
Here is a simple diagram of what we are going to achieve. For the sake of this article, I am going to give our VPC’s and nodes example IP space and addresses so it can help us in coming up with valid configurations.
| VPC 1 - Region 1 | ||
|---|---|---|
| VPC 1 Network | 172.16.0.0/16 | |
| vpn1.vpc1.example.com | 172.16.0.1 | |
| vpn2.vpc1.example.com | 172.16.0.2 | |
| VPN ENI (internal) | 172.16.0.10 | |
| VPN ENI (external) | 50.0.0.1 | |
| ENI Subnet | 172.16.0.0/24 | |
| ENI Subnet GW | 172.16.0.254 |
[!IMPORTANT] The config files will be using these example IP ranges.
AWS Configuration
The first requirement is to configure some options in AWS. I will be specifying addresses here for the work in VPC1. This process will need to be repeated in both VPC’s. I will assume that the VPC has been created and subnets are created inside of the VPC.
Security Groups
A security group is needed to allow the clustering software to communicate as well as the IPsec communication.
| “VPN” Security Group |
|---|
| Protocol |
| TCP |
| TCP |
| TCP |
| UDP |
| UDP |
| UDP |
| All Traffic |
Other SG’s will need to be modified to allow traffic into the other nodes within the individual VPC’s. For example, for services on VPC 1 that are accessed by VPC 2, VPC 1 SG’s will need to allow the traffic from 172.20.0.0/16. Configuring these SG’s is beyond the scope of this document.
Elastic Network Interface (ENI)
The next step is to configure an ENI that will be used to go between our instances, controlled by the clustering software.
In the AWS EC2 Console under “Network & Security” there is a Network Interfaces. Create an interface that is on the desired subnet. Add the “VPN” Security group we created to it.
The “Source/Destination Check” on the ENI needs to be disabled. This is a very important step as network traffic will not pass through this interface if this check is not disabled. To disable, right-click on the newly created ENI and select “Change Source/Dest. Check”. It needs to be in the disabled state.
[!IMPORTANT] Can we get some more explanation of why the default is wrong?
Elastic IP’s
We need to assign 3 Elastic IP’s (EIP) per region for this. 1 for each VPN Node, and one for the ENI. Allocate 3 EIP’s.
Assign one of the EIP’s to the ENI.
The EIP’s are needed for the VPN nodes because of the fencing that will be implementing in the cluster software. If a node is fenced, it will be shutdown. When it gets shut down, it will lose it’s external IP. By setting an EIP, it will not lose the external IP.
The EIP is needed on the ENI so that the remote side knows where to consistently send traffic to establish the VPN connection.
Identity and Access Management (IAM)
When the cluster becomes active it will need to communicate and issue commands against AWS. There needs to be an AWS account that can do fencing and also move the ENI between the clustered nodes. Let’s create a group with a user that has these capabilities.
Here is an IAM policy that can be used:
{
   "Version": "2012-10-17",
   "Statement": [
       {
           "Sid": "Stmt1431023463000",
           "Effect": "Allow",
           "Action": [
               "ec2:DescribeInstances",
               "ec2:DescribeTags",
               "ec2:StartInstances",
               "ec2:StopInstances",
               "ec2:AttachNetworkInterface",
               "ec2:DescribeNetworkInterfaceAttribute",
               "ec2:DescribeNetworkInterfaces",
               "ec2:DetachNetworkInterface",
               "ec2:ModifyNetworkInterfaceAttribute",
               "ec2:ResetNetworkInterfaceAttribute",
               "ec2:AssignPrivateIpAddresses"

           ],
           "Resource": [
               "*"
           ]
       }
   ]
}
Be sure to capture the AWS key and secret key for this user. It will be used later on.
Instances
It is time to create the instances now. We need to create 2 RHEL 7 instances. These instances will need to be on the same VPC Subnet. They will need to have the “VPN” SG that was created earlier.
Once the instances are created, assign each vpn node an Elastic IP.
Again, we need to disable the Source/Dest network check on each node. This is a very important step because clustering and routing will not work properly without it.
In AWS EC2 console, right click on the instance and go Networking -> Change Source/Dest. Check. Ensure that it is disabled.
Software Configuration
At this point the RHEL 7 instance should be up and running. It’s time to install some additional software and files that are needed.
RPMs
There are some additional packages that will make installing and configuring things easier. The Openshift team has packaged these into RPM’s. The yum software repository can be found here:
The RPM’s can be found here:
We need to install 3 primary packages, and the dependencies that they require. These packages are:
AWS CLI Utils
python-awscli-1.7.36-1.el7.noarch.rpm
This is the official AWS CLI just packaged in RPM. If you prefer to install via pip, they can opt for that. More information can be found at:
This tool will allow the cluster to interact with AWS.
Once installed, we need to configure the AWS CLI utils with the user created in the AWS IAM step from above. The easiest way to do this is, as root (cluster services run as root), run:
# aws configure
and follow the prompts. There is more information available about the AWS Command Line Interface
EC2 Utils
ec2-net-utils-0.5-3.el7.noarch.rpm ec2-utils-0.5-3.el7.noarch.rpm
These package comes from Amazon Linux AMI and create a set of udev rules that will allow the ENI to come up properly when it moves between cluster nodes.
Cluster Files
There are some additional files that are needed to manage AWS. I have made these available via a github repository
fence_ec2
This file will allow the cluster to use AWS calls to issue fencing commands of each of the hosts. To install:
# cp fence_ec2 /usr/sbin/fence_ec2
[!TIP] fence_ec2 is (was?) broken because AWS always returns “OK”, even when the request to terminate an instance was queued, not completed. This can cause the HA system to go in “split-brain” mode where two or more nodes try to take control.
eni
This is a resource script that will move the AWS ENI’s between cluster nodes. To install:
# cp eni /usr/lib/ocf/resource.d/heartbeat/eni
Libreswan Files
It’s time to install the rest of the packages needed for the cluster and VPN.
# yum install pcs fence-agents-all libreswan
Firewall
Let’s open ports on the firewall for cluster and ipsec:
# firewall-cmd --permanent --add-service=high-availability
# firewall-cmd --add-service=high-availability
# firewall-cmd --permanent --add-service=ipsec
# firewall-cmd --add-service=ipsec
# firewall-cmd --permanent --add-port=2888/udp
# firewall-cmd --add-port=4500/udp
Libreswan setup
When configuring Libreswan, in order to keep local and remote networks distinct, the following naming convention is used:
LEFT = LOCAL
RIGHT = REMOTE
Both VPN nodes on each side should be identically configured. To be more clear, vpn1.vpc1 and vpn2.vpc2 should be identical, and vpn1.vpc2 and vpn2.vpc2 should be identical.
PSK
Now, we need to generate a Host_to_host_VPN_with_PSK PSK
# openssl rand -base64 48
3LSVg7z7CAZKzPHM1IyCBrwOzxRL65+xncHxSqsXPL9JbwT1qNgvCuTfPfrj6jbZ
We will use this in our PSK files.
[!TIP] DO NOT USE THIS EXAMPLE PSK!
Config Files
All VPN nodes will have these two configuration files:
/etc/ipsec.conf
config setup
       protostack=netkey

include /etc/ipsec.d/*.conf
/etc/ipsec.secrets include /etc/ipsec.d/*.secret
</pre>
VPC1 /etc/ipsec.d/vpc1-vpc2.conf
conn vpc1-vpc2
  authby=secret
  type=tunnel
  esp=aes_gcm128-null
  mtu=1436
  left=172.16.0.10
  leftid=50.0.0.1
  leftsubnet=172.16.0.0/16
  right=100.0.0.1
  rightsubnet=172.20.0.0/16
  auto=start
  dpdaction=restart
  dpddelay=10
  dpdtimeout=60
/etc/ipsec.d/vpc1-vpc2.secret
50.0.0.1 100.0.0.1 : PSK ”3LSVg7z7CAZKzPHM1IyCBrwOzxRL65+xncHxSqsXPL9JbwT1qNgvCuTfPfrj6jbZ”
VPC2 /etc/ipsec.d/vpc1-vpc2.conf
conn vpc1-vpc2
  authby=secret
  type=tunnel
  esp=aes_gcm128-null
  mtu=1436
  left=172.20.0.10
  leftid=100.0.0.1
  leftsubnet=172.20.0.0/16
  right=50.0.0.1
  rightsubnet=172.16.0.0/16
  auto=start
  dpdaction=restart
  dpddelay=10
  dpdtimeout=60
/etc/ipsec.d/vpc1-vpc2.secret
50.0.0.1 100.0.0.1 : PSK ”3LSVg7z7CAZKzPHM1IyCBrwOzxRL65+xncHxSqsXPL9JbwT1qNgvCuTfPfrj6jbZ”
Cluster Setup
At this point it’s time to configure the cluster. We will use the pcs command to configure and setup the cluster. More information on configuring the cluster can be found in the Red Hat HA Administration Guide
[!NOTE] It is assumed that the nodes have DNS entries which point to the appropriate hosts.
Do the following on both nodes:
Set the password for the ‘hacluster’ user to the same password:
# passwd hacluster
Start and enable the pcsd service:
# systemctl start pcsd.service
# systemctl enable pcsd.service
On one of the cluster nodes, ensure that all nodes are authorized:
# pcs cluster auth vpn1.vpc1.example.com vpn2.vpc1.example.com
Username: hacluster
Password:
vpn1.vpc1.example.com: Authorized
vpn2.vpc2.example.com: Authorized
Configure the cluster:
# pcs cluster setup --start --name vpc1-cluster vpn1.vpc1.example.com vpn2.vpc1.exmaple.com
Enable cluster services to run on boot:
# pcs cluster enable --all
At this point, the cluster should be up and running. To verify the status run:
# pcs status
Stonith config
We need to enable stonith in the cluster. In the pcmk_host_map I am
inserting the hostname:
# pcs stonith create ec2_fencing fence_ec2 pcmk_host_map='vpn1.vpc1.example.com:i-XXXXXXX;vpn2.vpc1.example.com:i-YYYYYYY' \
  pcmk_host_list=vpn1.vpc1.example.com,vpn2.vpc1.example.com pcmk_host_check=static-list region=us-east-1
ENI Resource
We now need to create the ENI resource. Requirements that are needed for the ENI resource:
- ENI ID: This is needed so the AWS script knows which ENI to use.
- gateway: This is used to set up routes on the node.
- group: we are creating a resource group so that the ENI and ipsec service will be grouped and moved together.
# pcs resource create vpn_eni ocf:heartbeat:eni ec2_region=us-east-1 eni_id=eni-ZZZZZZ device_index=1 device_name=eth1 \
  gateway=172.16.0.254 wait=5 --group ipsec_group op monitor interval=60s defaults timeout=120s start timeout=120 stop timeout=120s
At this point, the ENI should now be attached to a node in the cluster. We can check by running:
# pcs status
qoarum
Be sure to disable quorum in a two-node cluster or else the services will shut down when a node is lost. quorum can be disabled using:
pcs property set no-quorum-policy=ignore
(Quorum is optional, fencing is not)
IPSEC Service Resource
At this point, IPSEC should be running. To check, run:
# pcs status
Now, one of the sides of the VPN should be configured. The other side can be configured using the same steps. Once both sides are configured, the VPN tunnel should be established between the two sites. To see what tunnels are up and running in libreswan, run:
# ipsec whack --trafficstatus
If the tunnels are listed here, they are up. Another command to help debug is:
# ipsec status
AWS Routing
The last step is to adjust the VPC routing table on each side of the VPC. We need to route the other subnets through the VPN ENI. This step is a bit different than traditional routing. Instead of routing to an IP that would normally be done, we are going to route to the ENI. When referencing the “target”, we need to specify the ENI ID instead of the IP.
In AWS VPC console:
- Click on the Route Tables section
- Select the route table for the VPC
- In the bottom pane, click on the Routes tab
- Click Edit
- Click Add another route
- Put in the remote network. For VPC1’s route table, enter “172.20.0.0/16” as the destination.
- In the target, type in the VPN ENI ID
- Click Save
Repeat this procedure on the other VPC.
If everything was done properly, traffic should be able to flow between the sites. Simple pings can test the connectivity.